

What Is a Survivalist Seed Bank Prep Strategy?
A survivalist seed bank is a curated stash of open-pollinated or heirloom seeds, stored and managed so it can produce food year after year instead of running out like a pantry of canned goods. That renewability is the whole point.
- Renewable, not finite: unlike stored calories, seeds regenerate themselves if you save the next generation.
- Compact: a year’s worth of staple-crop seeds fits in a shoebox.
- Cheap: a well-planned bank costs less than a single case of freeze-dried meals.
The rest of this guide walks through how to pick the right seeds, store them so they stay alive, and keep the whole system running for decades.
Key Takeaways
A survivalist seed bank works because it pairs open-pollinated seed selection with disciplined storage, testing, and rotation, not a one-time purchase.
| Point | Details |
|---|---|
| Choose open-pollinated varieties | Heirloom and open-pollinated seeds breed true, unlike unpredictable hybrid seed. |
| Dry, then double-package | Break-test dry seed, then move to paper envelopes and sealed mylar or jars with desiccant. |
| Test germination every winter | Sample 10 seeds per lot; below 50% germination, schedule a grow-out soon. |
| Keep off-site duplicates | Split critical staple seed between home storage and a separate, trusted location. |
| Protect the cache physically | A rugged bag from Fs9tactical keeps seed jars and packets organized and weatherproof during storage or a move. |
Table of Contents
- What Should You Include in a Survivalist Seed Bank?
- How Do You Store Seeds So They Stay Viable for Years?
- How Do You Test and Rotate Seeds to Keep Them Viable?
- How Much Seed Should You Store and When?
- Why Redundancy and Off-Site Backup Matter
- What Legal Rules Apply to Seed Saving and Storage?
- How Do You Solve Common Seed Bank Problems Like Pests, Mold, and Viability Loss?
- Author’s Note: The Value of a System vs a Pre-Packed Bucket
- Protecting Your Seed Cache With the Right Gear
- Sources
What Should You Include in a Survivalist Seed Bank?
Open-pollinated and heirloom seeds are the backbone of any real survival seed bank because they breed true. Save seed from this year’s tomato and you get the same tomato next year. Hybrid seed from the grocery store or a big-box garden center often produces unpredictable, sometimes sterile, offspring, which defeats the entire purpose of a renewable food source.
Prioritize calorie density and speed to harvest by choosing varieties suited for your climate, as suggested in this low maintenance vegetable garden advice. Dry beans, corn, winter squash, potatoes, and paste tomatoes deliver the bulk of your food energy, while kale, radish, and other quick greens fill the gap in the first 30 to 60 days when nothing else is ready.
- Dry beans and corn for storable calories
- Winter squash for calories plus long shelf life on the vine
- Kale, radish, and lettuce for fast, low-effort nutrition
- Tomatoes and peppers for variety and preservation options
Pollination biology matters more than most first-time preppers realize. Self-pollinating crops like beans, tomatoes, and peas are forgiving. Outcrossers like corn and squash cross-pollinate with nearby varieties, so you need isolation distance or hand-pollination if you’re saving seed from more than one variety. Buy from seed houses that publish germination rates and regional trial data rather than generic mail-order catalogs; that transparency tells you whether a variety was actually tested in a climate like yours, a point echoed in guidance on building a survival seed bank.
Pro Tip: Start with five to eight varieties you already know how to grow. A seed bank full of unfamiliar crops is a gamble, not a plan.
How Do You Store Seeds So They Stay Viable for Years?
Seed longevity comes down to four variables: cool, dark, dry, and stable. Miss any one of them and the clock on viability starts running fast. Heat and moisture are the real killers, and their effects compound: cutting both temperature and moisture together extends storage life far more than reducing either one alone, according to survival seed bank storage guidance.
Here’s the packaging workflow that actually works:
- Dry to the break point. Seeds should snap rather than bend. Beans and corn are ready when they crack instead of denting under a thumbnail.
- Store in paper envelopes first. Paper lets any residual moisture escape without trapping it against the seed.
- Move to airtight secondary packaging. Mylar bags or glass jars with a silica desiccant packet come next, sealing out humidity for the long haul, a method detailed in this home seed bank guide.
- Add a sealed outer container. A waterproof tote or ammo can protects the inner packaging from spills, pests, and light.
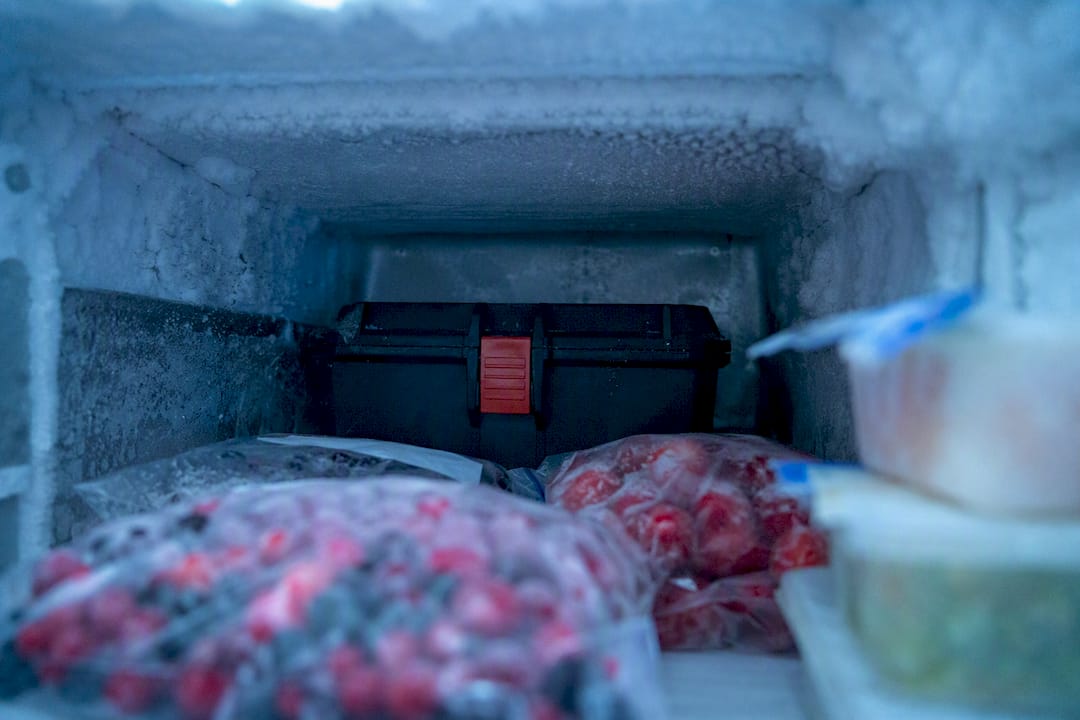
For temperature, a refrigerator (roughly 35 to 40°F) works for one to two years of active-use seed. A chest freezer extends that window considerably. The catch: never open a container straight out of the freezer. Let it sit sealed until it reaches room temperature, or condensation will form inside and soak the seeds you just spent months protecting, a step seed-saving guidelines call non-negotiable.
One household habit ruins more seed banks than any pest or disease: storing seeds in the refrigerator door. The constant temperature swing from opening and closing does more damage than a slightly warmer but stable shelf ever would. Keep your seed containers in the back of the fridge or freezer, labeled clearly, in a waterproof outer bin.
How Do You Test and Rotate Seeds to Keep Them Viable?
A seed bank without records is just a box of hope. Every packet needs a label with variety name, source, harvest year, and lot number, mirrored in both a paper logbook and a digital spreadsheet or note. If the paper copy gets damaged, the digital one survives, and vice versa.
- Run a germination test every winter. Pull 10 seeds from a lot, fold them into a damp paper towel, seal in a plastic bag, and keep at room temperature.
- Check daily starting day 5. Most vegetable seeds sprout within 7 to 14 days.
- Score the result. Above 70% germination, the lot is solid for another year. Below 50%, schedule a grow-out soon. Below 25%, replace it now.
- Log the number, date, and lot in your inventory so you can track decline over seasons rather than guessing.
When a lot’s germination rate drops, that’s your cue to plant it out and harvest fresh seed, called a grow-out. For outcrossing crops like corn and squash, plan isolation distance or staggered planting dates before you commit garden space, a discipline survival seed bank planning resources treat as essential, not optional. Always keep two lots of your most critical staples so one bad test doesn’t leave you without backup seed.
How Much Seed Should You Store and When?
A rough starting point for one adult: half a pound each of dry beans and corn seed, a few dozen squash and tomato seeds, and a full packet each of fast greens like kale and radish. Double or triple those numbers for a household of four, and always keep more of the staples than the extras.
- Staples (beans, corn, squash, potatoes): store in bulk, replace slowest
- Quick producers (radish, lettuce, kale): store smaller amounts and cycle faster
- Seed-saving ease: favor self-pollinators early, add outcrossers once you have isolation space
Build your calendar around the seasons rather than trying to do everything at once. Winter is germination-testing season, since you’re not in the garden anyway. Late winter into spring is when you plan grow-outs for any lot that tested weak. Fall, after harvest, is restocking season, when you process and package the new seed you saved that year.
Keep a simple seasonal log: variety, germination percentage, quantity on hand, and next action (retest, grow-out, or restock). Three lines per variety, updated four times a year, is enough to keep the whole system honest.
Why Redundancy and Off-Site Backup Matter
A seed bank that lives in one location is one house fire, flood, or theft away from zero. Duplicate your most critical staple varieties and store the backup somewhere else entirely: a relative’s house, a rented storage unit, or a buried cache in a sealed container.
- Split your top five staple varieties between home and an off-site cache
- Use a compact, waterproof container built for a portable cache, not your full working inventory
- Trust only people who understand what they’re holding and why it matters
- Rotate or relocate a cache after any major regional event that might expose its location
Pro Tip: A portable cache doesn’t need to be complete. It needs to survive. Pack the seeds that matter most for calories, seal them well, and keep the inventory list short enough to memorize.
What Legal Rules Apply to Seed Saving and Storage?
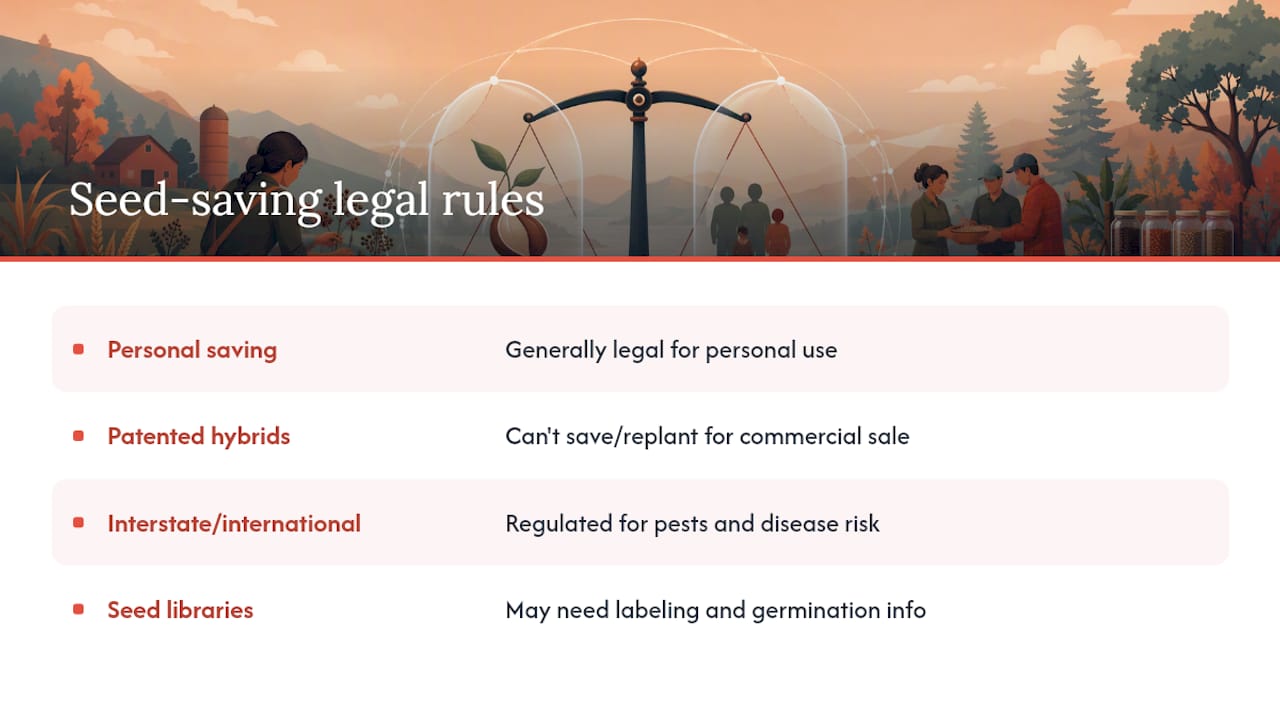
Saving and storing seed from most home garden varieties is legal in the United States, and nothing about a personal seed bank requires a permit. The restrictions that do exist are narrower than most preppers assume, and they mostly concern selling or transporting seed, not saving it for your own use.
Patented and trademarked hybrid varieties, often labeled with a plant variety protection notice or a utility patent number, legally restrict saving and replanting seed for commercial purposes. Growing one in your backyard for personal use is generally fine, but propagating and selling it isn’t. That’s one more reason open-pollinated and heirloom varieties are the practical foundation of a survival seed bank: they carry no such restriction.
Interstate seed sales and some international seed shipments are regulated under USDA phytoplasm and noxious-weed rules meant to stop invasive species and plant disease, not to police home gardeners. If you’re buying from a US seed house for your own garden, this rarely affects you. It matters more if you’re trading seed internationally or acquiring wild-collected seed of unknown origin, where invasive-species and biosecurity rules can apply.
State-level seed libraries and seed-swap events occasionally run into local health or agricultural department rules about labeling and germination disclosure, mostly aimed at organizations distributing seed publicly, not individuals building a personal stash. If you plan to donate or trade seed through a formal seed library, check your state’s agricultural extension office first. For straightforward personal prepping, the practical legal bar is low: save what you grow, buy from legitimate sources, and don’t resell patented varieties.
How Do You Solve Common Seed Bank Problems Like Pests, Mold, and Viability Loss?
Pests, mold, and slow viability decline account for nearly every seed bank failure, and all three trace back to the same root cause: moisture.
Pest infestation usually starts with weevils or moth larvae that hitchhike in on beans, corn, or grain seed. Freezing new seed lots for 48 hours before adding them to your bank kills most eggs and larvae before they spread to the rest of your inventory. Store seed in rigid containers rather than flexible bags. A determined weevil chews through paper and thin plastic without much trouble.
Mold shows up when seed goes into storage even slightly damp, or when a sealed container gets opened cold and traps condensation inside, the exact failure mode seed-saving guidelines warn against with frozen containers. The break test described earlier is your best defense: seed that snaps cleanly is dry enough to store. Seed that bends or feels leathery needs more drying time before it goes anywhere near a sealed jar.
Viability loss is the slow, quiet failure mode. Every lot degrades eventually, even under perfect conditions, which is exactly why the annual germination test and grow-out cycle exist. Catching a lot at 60% germination and refreshing it through a grow-out beats discovering at 5% that your only corn seed is dead. Treat testing as maintenance, not an optional extra step, and viability loss stops being a crisis and becomes routine upkeep.
Author’s Note: The Value of a System vs a Pre-Packed Bucket
Most commercial survival seed buckets promise decades of food security in a sealed pouch, but they skip the part that actually matters: knowing whether your seed still germinates when you need it. A curated collection with real inventory tracking and annual grow-outs beats a mystery bucket every time, a distinction worth remembering before you buy a pre-made kit. Gear reliability and seed reliability follow the same rule: you trust what you’ve tested, not what’s still sealed. For broader context on building preparedness beyond seeds, see FS9 Tactical’s guide to outdoor emergency scenarios gear.
— Cody
Protecting Your Seed Cache With the Right Gear
Seeds are only as safe as the container they’re sitting in. A jar of heirloom corn seed does you no good if it gets crushed in a move, soaked in a flood, or left disorganized in a box you can’t find at 2 a.m. FS9 Tactical builds gear for exactly that kind of failure point: ballistic fabric, reinforced stitching, and MOLLE organization that keeps small, critical items separated and protected instead of loose in a drawer.
For seed jars and mylar packets specifically, a rugged tactical gear bag gives you compartmentalized, waterproof storage you can grab and move on short notice, whether that’s relocating an off-site cache or bugging out with your working seed inventory intact. If you’re building out a broader kit alongside your seed bank, the 60-in-1 emergency survival kit covers the rest of your immediate-term needs so your seed stash isn’t carrying the whole load of your preparedness plan. Check either product page for current specs and pick the one that matches how you plan to move your cache when it matters.
