

What to Bring: A Class-Ready Carbine Loadout That Works
Here’s the short version: bring a carbine you can adjust on the fly, a red dot, a two-point sling, at least three magazines (six is better), 600 to 700 rounds, and a range bag with everything else. Set your stock so it fits you with whatever kit you’re wearing, and expect to tweak it during the day. A carbine class loadout isn’t a fixed kit you buy once and forget. It’s a starting configuration you test and adjust in real time.
- Rifle: AR-platform carbine, 16-inch barrel is standard
- Optic: red dot, mounted and zeroed
- Sling: two-point, adjustable
- Magazines: 3 minimum, 6+ recommended
- Ammo: 600 to 700 rounds
- Range bag: packed and organized before you leave the house
Instructors expect you to walk in with a workable baseline, not a finished product. You’ll adjust stock length, check your optic mount, and rework your magazine pouches after the first few drills tell you what’s actually wrong.
Key Takeaways
A class-ready carbine loadout succeeds when the rifle fits the shooter’s body first and every accessory earns its place by reducing friction during drills.
| Point | Details |
|---|---|
| Bring enough ammo | Pack 600 to 700 rounds and at least 3 magazines, ideally 6 or more, for a full day of drills. |
| Fit the rifle to you | Set length of pull and cheek weld with your class-day gear on, not in a t-shirt at home. |
| Prioritize function over looks | Buy a red dot, light, and sling before spending on triggers or cosmetic upgrades. |
| Test everything beforehand | Dry-fire your optic mount and check for creep before you ever load a live round. |
| Pack organized, durable gear | An Fs9tactical range bag and sling keep magazines, tools, and your rifle staged and protected all day. |
Table of Contents
- What Goes in a Minimum Carbine Class Loadout?
- How Do You Size and Set Up Your Rifle Before Class?
- How Much Ammo and How Many Magazines Do You Need?
- What Accessories Actually Matter for a Carbine Class?
- What Should You Pack in Your Range Bag?
- What Happens on Day One of a Carbine Class?
- What Shooting Positions Do Carbine Classes Actually Teach?
- Do You Need to Train Physically Before a Carbine Class?
- What Instructors Get Right That Gear Reviews Miss
- Gear That Holds Up to a Full Class Day
- Sources
What Goes in a Minimum Carbine Class Loadout?
Most carbine classes accept AR-style platforms without much fuss, but read the course description before you show up. Some instructors ban muzzle devices without a class II license consideration, cap barrel length, or require a specific optic type for certain drills. A quick email to the range or instructor beats guessing.
Ammo and magazine counts matter more than most students think going in. Course pages commonly list 600 to 700 rounds and at least three magazines as the baseline requirement, and that number isn’t arbitrary. A full day of drills, malfunction clearances, and reshoots burns through rounds faster than a static range session. Three magazines will get you through the day, but you’ll spend half your time reloading from loose ammo instead of watching the instructor. Six or more magazines keeps you in the drill.
Here’s a packing priority order that works for most one-day carbine courses:
- Rifle, zeroed and function-checked the night before, not the morning of.
- Six-plus magazines, inspected for cracked feed lips or worn baseplates.
- 600 to 700 rounds of ammo appropriate for the course (more below).
- A sling, mounted and adjusted to your body, not left in the box.
- Magazine holders or a battle belt, if the course requires or recommends one.
- Eye and ear protection, plus electronic muffs if you want to hear commands clearly.
- A chamber flag, multi-tool, and spare batteries for your optic and light.
Pro Tip: Load your magazines the night before class, not in the parking lot. A rushed 6 a.m. loading session is exactly when you shortchange your spring tension or miss a bent feed lip.
If your course requires a belt or chest rig, don’t buy one the week before class and skip fitting it. Wear it around the house for an hour first. Gear that feels fine standing in your kitchen can bind, shift, or dig in after four hours on your feet.
How Do You Size and Set Up Your Rifle Before Class?
Fit beats accessories every time, and this is the section most students skip because it feels less exciting than buying a new light. A rifle that fits your body will outperform an over-accessorized carbine with a stock set wrong or a grip that fights your hand.
Start with length of pull. A common baseline: place the butt stock in the crook of your elbow and see where your trigger finger naturally falls relative to the trigger. That’s your starting point, not your final answer. If you’ll be wearing body armor, a plate carrier, or heavy layers in class, measure with that gear on, because a stock that fits perfectly in a t-shirt can suddenly feel a full stop short once you add bulk to your chest.
Cheek weld comes next. Your head position needs to be repeatable, shot after shot, without you consciously hunting for it. If you’re running a red dot, eye relief is forgiving. Magnified optics are less forgiving. You’ll need consistent head placement to get a full, clear sight picture every time you shoulder the rifle.
A few things worth checking before you leave the house:
- Does your pistol grip let your trigger finger rest naturally without straining your wrist?
- Can you reach your safety selector without breaking your firing grip?
- Does your optic mount stay put after a firm push forward and side to side?
On that last point: apply forward pressure when torquing your optic mount to the rail. Mounts that shift under recoil are almost always the result of insufficient forward bias during installation, not a bad optic. Dry-fire a few times and watch for any visible creep before you ever load a round.
Instructor guidance backs this up directly: there’s no single turn-key carbine configuration that works for everyone. What matters is a rifle you’ve deliberately fitted to your own body, checked before class, and can still adjust once live drills start.
How Much Ammo and How Many Magazines Do You Need?
The 600 to 700 round figure isn’t a random number instructors picked out of the air. It accounts for zero confirmation, multiple drill repetitions, malfunction-clearance reps, and the inevitable reshoots when a group opens up wider than you’d like. Shorter half-day courses might only need 300 to 400 rounds. Multi-day carbine courses can push past 1,000. Check your specific course description and add a buffer, because running dry on the line mid-drill costs you reps you can’t get back.
Standard FMJ ammunition covers the vast majority of carbine class drills. Some instructors have specific requests for match-grade ammo during precision segments, or restrict certain steel-core or bimetal-jacketed rounds at indoor or specific outdoor ranges. Confirm with your instructor before you show up with a case of the wrong stuff.
Magazine care matters more than people give it credit for:
- Inspect feed lips for bends or cracks before you load them.
- Check baseplates and springs, especially on magazines that have sat loaded for months.
- Use a speed loader if you have one. It’s faster and more consistent than thumbing rounds in one at a time.
- Don’t leave magazines loaded to max capacity for years at a time without cycling them. It’s a myth that this alone kills springs quickly, but periodic rotation is still good practice.
Label your magazines if you’re running more than six. It sounds fussy until you’re digging through a pile mid-drill trying to find the one with five rounds left instead of thirty.
What Accessories Actually Matter for a Carbine Class?
Budget and time are both limited, so spend them on the accessories that change how you shoot, not the ones that just change how your rifle looks. A widely cited priority order for carbine accessory upgrades puts function ahead of flash, and it holds up well for class prep specifically.
- Red dot optic. Nothing speeds up target acquisition like a dot. If you’re choosing between a light and an optic on a tight budget, buy the optic first.
- Weapon light, if your course includes any low-light or simulated-scenario segments. Check the course description; not every class needs one.
- Two-point sling. It lets you transition to a pistol, clear a malfunction, or move your hands without your rifle swinging loose or falling to the ground.
- Upgraded trigger. A crisp, consistent trigger pull improves accuracy more than most students expect, but it’s a refinement, not a requirement, for your first class.
- Improved stock. Comfort and adjustability matter over a long day, but a stock swap ranks below getting your optic and sling sorted.
Mount your light and any pressure switch where your support hand naturally falls, not where it looks correct in a photo. The same goes for sling QD points: place them where you can transition or drop the rifle without fumbling.
Skip vertical foregrips, patterned dust covers, and other accessories that don’t change how the rifle runs. A simpler rifle is easier to manipulate under stress, and instructors consistently report that added complexity slows down students more than it helps them.
Pro Tip: If you’re not sure whether an accessory earns its spot, ask yourself if it makes reloading, aiming, or clearing a malfunction faster. If the answer is no, leave it off for your first class.
What Should You Pack in Your Range Bag?
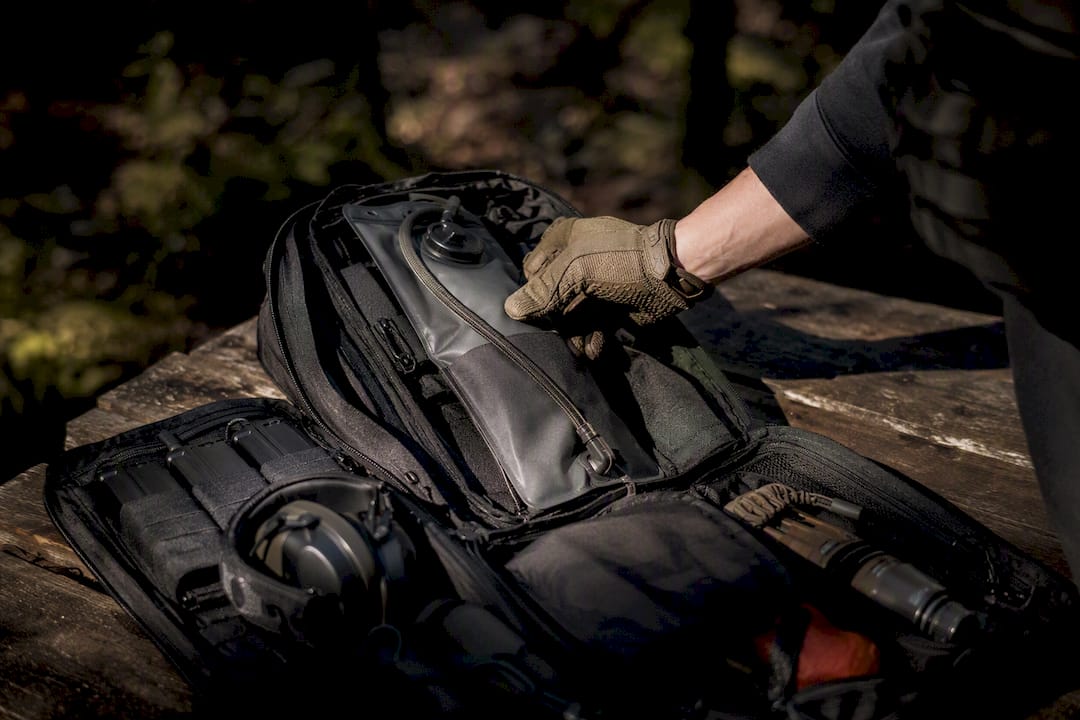
Your range bag is doing double duty: keeping your gear organized and getting you through eight hours on your feet without a mid-day gear meltdown. Split your packing list into firearm-related items and personal items, because mixing them together in one jumbled bag is how people lose track of loaded magazines next to their lunch.
Firearm and range items: ear and eye protection (bring backups), a notebook and pen for instructor notes, spare batteries for your optic and light, a small bottle of lube, a basic cleaning kit, chamber flags, and labeled pouches for your spare magazines.
Personal items: water (more than you think you need), snacks, sunscreen, a hat, broken-in shoes you’ve actually walked in, hygiene wipes, and an extra pair of socks. Community range checklists consistently flag hydration, sun protection, and spare socks as the small items that save a long training day.
Keep live ammo sealed and separate from your tools and electronics. A well-organized range bag with dedicated compartments means you’re not digging past a cleaning kit to find your last box of ammo during a timed reload drill.
What Happens on Day One of a Carbine Class?
Arrive early enough for an instructor to check your gear before the safety brief starts. Most instructors look at your magazines, sling attachment, safety selector function, and whether you’re using a chamber flag correctly during load-and-make-ready.
- Learn the range commands before you arrive if you haven’t heard them before: “muzzle awareness,” “cleardown,” and immediate action procedures for a malfunction.
- Keep your muzzle downrange at all times, even when you’re not actively shooting.
- Watch your own groups and malfunctions. A pattern of failures to feed points at your magazines or ammo. Consistent wide groups point at your fit, not your skill.
- Ask for feedback between strings, not mid-drill. A quick “does my grip look off to you?” between reps gets you a useful answer without holding up the line.
What Shooting Positions Do Carbine Classes Actually Teach?
Standing, or offhand, is where most classes start because it’s the least stable and forces you to build real fundamentals instead of leaning on a barricade for support. From there, instructors typically move to kneeling, which trades some mobility for a lower center of gravity and a steadier platform for precision shots.
Prone comes next in most curriculums, and it’s usually the most stable position you’ll shoot from, assuming the terrain cooperates. Some classes add a seated position for vehicle or confined-space scenarios, since standing and kneeling aren’t always options in a real environment.
Beyond the basic four, expect barricade work: shooting around cover from both strong-side and support-side, often from standing, kneeling, or a modified prone. This is where your sling setup actually gets tested, since transitioning around a barricade with a loose or poorly adjusted sling turns into a wrestling match instead of a smooth shift.
Transition drills between positions matter as much as the positions themselves. Instructors want to see you move from standing to kneeling to prone without losing your sight picture or fumbling your grip, and this is usually where a poorly fitted stock or an uncomfortable sling reveals itself. If you’re stiff getting into prone or your gear snags on the way down, that’s data. Note it, and be ready to adjust your kit at the next break.
Do You Need to Train Physically Before a Carbine Class?
A one-day carbine class is more physical than most first-timers expect. You’re standing, kneeling, and dropping into prone repeatedly, often carrying a rifle, a belt, and spare magazines for six to eight hours straight. Cardiovascular endurance and basic mobility matter more than raw strength.
A short warm-up routine before class helps: dynamic stretches for your hips and shoulders, a few minutes of bodyweight squats to open up your knees and ankles for kneeling and prone transitions, and some shoulder mobility work since you’ll be shouldering and dropping your rifle constantly. If you know your course includes movement drills or barricades, practice getting in and out of kneeling and prone at home first. Your body will thank you by the third hour.

Grip endurance is an underrated factor. A full day of gripping a rifle, working a charging handle, and manipulating magazines fatigues your forearms in a way that surprises people who assumed shooting was mostly about aim. A little forearm and grip conditioning in the weeks before class pays off more than most people expect.
What Instructors Get Right That Gear Reviews Miss
The gap between what most gear guides push and what actually matters in a class is bigger than people realize. Gear reviews sell accessories. Instructors care about whether your rifle fits your body and whether you can run it under mild stress without fighting your own setup.
Conventional advice tends to front-load spending on optics and lights while treating stock length and cheek weld as an afterthought. That’s backward. A student with a properly fitted stock and a basic red dot will consistently outshoot someone running premium glass on a rifle that doesn’t fit them. Fit is free once you know how to measure it. Optics cost money either way.
If you take one thing from this article, take this: buy your gear in the priority order that changes your performance, not the order that looks impressive in a photo. Test everything before class day, not during it. And treat your first few range trips as data collection, not a final exam. The rifle you walk in with should be close enough to right that you spend class time refining, not rebuilding.
— Cody
Gear That Holds Up to a Full Class Day
You don’t need to overthink your kit if you start with gear built to survive a real training environment. Fs9tactical covers the checklist items that take the most abuse: a tactical gear bag built with reinforced stitching and MOLLE webbing for staging magazines and tools where you can reach them fast, a tri-point combat sling for retention that holds up to barricade and transition drills, and soft rifle cases built with ballistic fabric for getting your carbine to the range without damage.
FS9 Tactical has built its reputation as the second-largest soft rifle case maker in the U.S. on gear that over 20,000 customers rely on for hunting, training, and range days. The stitching and padding are designed for gear that gets used hard, not gear that sits in a closet. If your current bag is falling apart at the seams or your sling keeps slipping loose mid-drill, check the Tactical Gear Bag before your next class and get your loadout squared away before you’re standing on the line.
Sources
- Baseline Carbine (course landing page)
- Carbines for new shooters - International Tactical Training Seminars
- Best AR-15 Accessories 2026: Must-Have Upgrades Ranked by Category
- Setting up your tactical carbine: stocks, grips and sights - SWATmag
Recommended
- What to Bring to the Range: The Complete AR-15 Range Bag Setup – FS9 Tactical
- What to Bring to the Range: The Complete AR-15 Range Bag Setup – FS9 Tactical
- What to Bring to the Range: The Complete AR-15 Range Bag Setup – FS9 Tactical
- What to Bring to the Range: The Complete AR-15 Range Bag Setup – FS9 Tactical
