

Attachment Points in Tactical Packs: 2026 Field Guide
Attachment points on tactical packs are defined as fixed or woven anchor systems that let you mount, secure, and organize gear on the exterior and interior of a pack. The role of attachment points in tactical packs goes far beyond simple hooks and loops. MOLLE (Modular Lightweight Load-carrying Equipment) webbing, PALS (Pouch Attachment Ladder System) grids, daisy chains, D-rings, and lash tabs each serve a distinct structural or accessory function. Together, they determine how well your pack distributes weight, how fast you can reach critical gear, and whether your setup holds together under real field conditions. Getting these details right separates a functional kit from one that fails at the worst moment.
What types of attachment points are found on tactical packs?
Tactical packs use four primary attachment systems, and not all loops serve the same functional strength. Treating them as interchangeable is the most common mistake serious users make.
MOLLE/PALS webbing is the backbone of any load-bearing tactical pack. This system uses rows of nylon webbing stitched at measured intervals, allowing compatible pouches to weave through and lock in place. MOLLE/PALS webbing is engineered with reinforced stitching and materials to carry structural loads and maintain pack integrity during rough use. That means it handles holsters, magazine pouches, medical kits, and other weighted accessories without deforming or pulling loose.
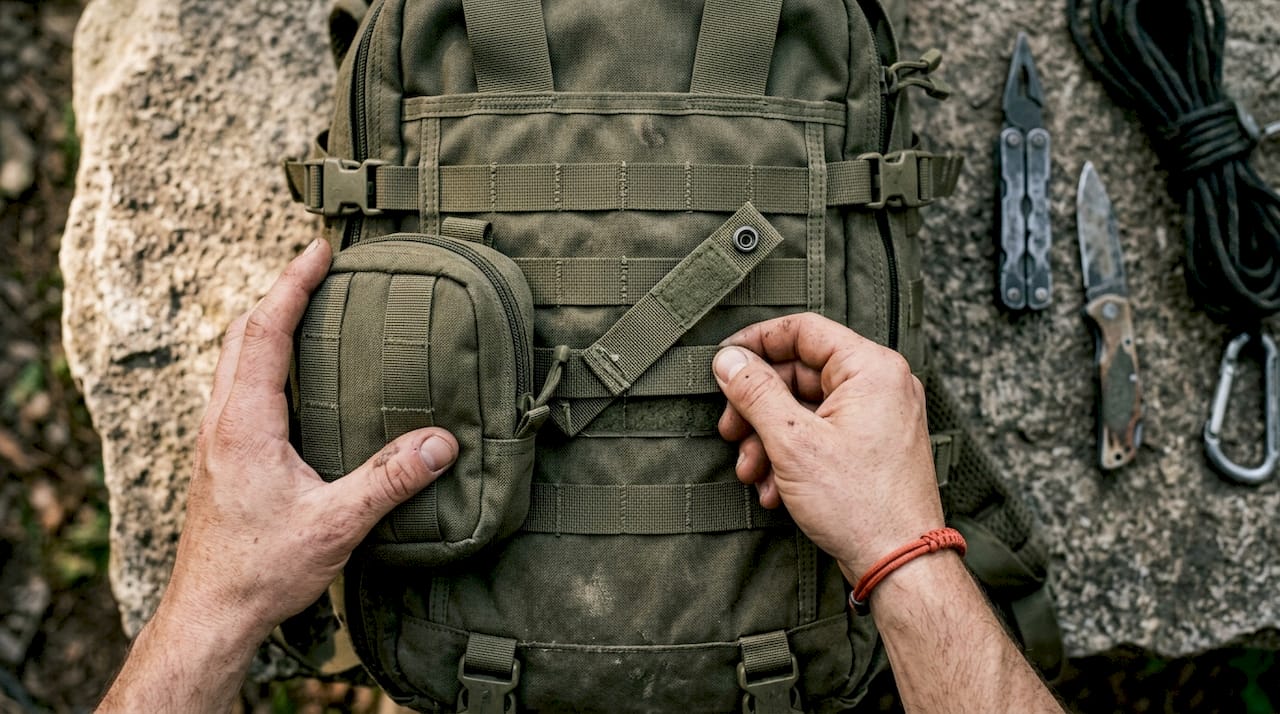
Daisy chains are vertical loops of webbing running along the sides or front of a pack. They look load-capable, but they are not. Daisy chains are designed for routing and securing lightweight accessories, not for bearing heavy loads. Overloading them risks stitching failure at the worst possible time.
D-rings and lash tabs fill a different role. D-rings provide a hard anchor point for carabiners, bungee cords, or tethers. Lash tabs, the rubber or nylon X-shaped patches found on many packs, work best for threading paracord or attaching lightweight items like a rain cover or a small tool.
Here is a quick breakdown of each type and its appropriate use:
- MOLLE/PALS webbing: Heavy pouches, holsters, magazine carriers, medical kits
- Daisy chains: Trekking poles, lightweight stuff sacks, cord management
- D-rings: Carabiner clips, key fobs, short tethers
- Lash tabs: Rain covers, paracord loops, small tools
Pro Tip: Always test your attachment zones under load before heading into the field. Clip your pouch in, load it to mission weight, and give it a firm tug in every direction. If the webbing shifts or the stitching shows stress, reposition or replace the attachment.
How do attachment points affect load management and pack stability?
Weight distribution is the single biggest factor in pack performance during high-intensity activity. Experts confirm that weight distribution significantly affects user comfort and mission success when using tactical packs. A poorly loaded pack shifts your center of gravity backward, forcing your spine to compensate and accelerating fatigue.
The physics are straightforward. Every item you hang on an external attachment point moves weight away from your body’s center line. That shift creates a lever effect. The farther the weight sits from your back, the harder your core and shoulders work to stay upright. This is why dense, heavy items belong close to the body, with external points reserved mostly for lightweight or quick-access gear.
Properly designed attachment points prevent equipment from pulling the bag off-center during high-intensity use. This is not a minor comfort issue. On a long patrol or a steep mountain approach, a pack that pulls left or right causes muscle imbalances that compound over hours. The loop layout on professional-grade packs is part of the integrated load-bearing design to maintain balance during movement.
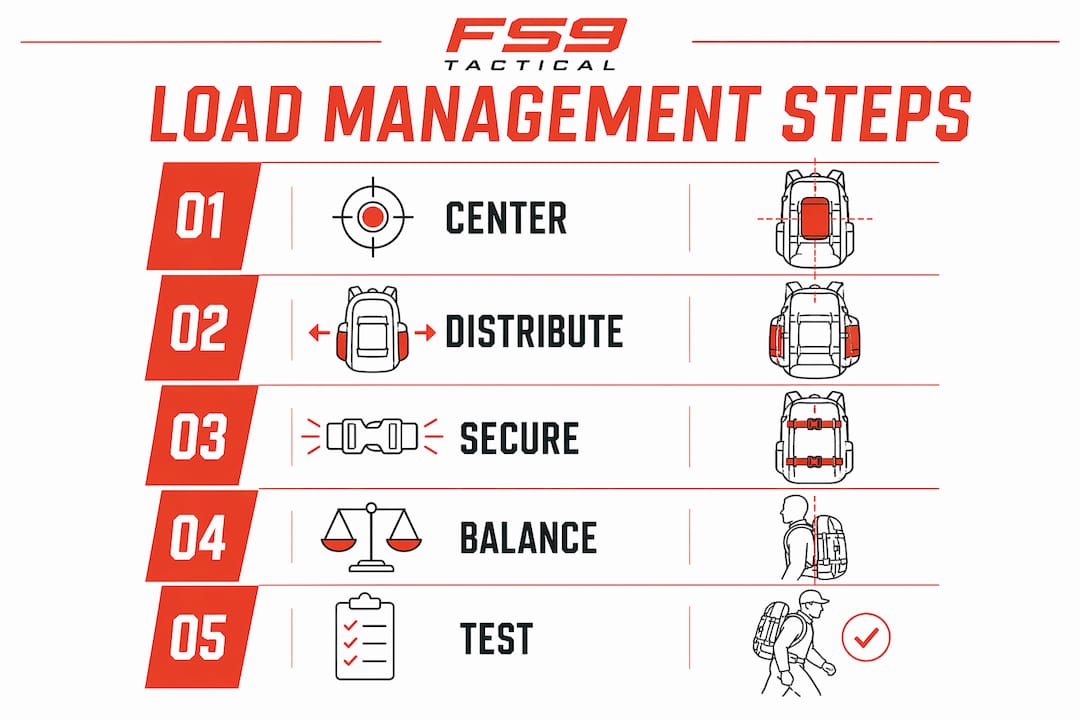
Here is a practical load management sequence to follow before any mission or outing:
- Pack the heaviest items first, positioned vertically against your back panel. Think water, food, and dense gear.
- Fill mid-weight items in the main compartment around the heavy core, keeping the load symmetrical left to right.
- Use external MOLLE points only for items under roughly two pounds, such as a first aid pouch, a radio, or a hydration tube clip.
- Tighten compression straps after loading. Properly tightened compression straps eliminate load shifting, which is critical for heavier tactical gear.
- Adjust shoulder straps and hip belt so the pack rides high and tight against your back before moving.
Following this sequence keeps your center of gravity stable and reduces the muscular effort required to carry the same weight over distance.
How to properly use attachment points on tactical packs
Knowing the types of attachment points is only half the equation. Knowing where to put specific gear is what separates a well-configured pack from a liability. The MOLLE system increases customization, allowing you to add pouches, holsters, and other gear modularly for mission-specific configurations. That flexibility is the system’s greatest strength, and its greatest trap.
The trap is this: modularity tempts users to keep adding gear externally until the pack becomes a cluttered, unbalanced mess. Every external attachment increases your pack’s profile and snag risk. Loose gear causes noise and movement that hinders stealth and comfort. Tighten every pouch, fold away excess straps, and remove anything you are not actively using on that specific outing.
Here are proven placement strategies by gear type:
- First aid kit: Mount on the front or side MOLLE panel at waist height for one-handed access. Use a dedicated IFAK pouch with a pull tab.
- Hydration bladder: Keep inside the main compartment or a dedicated hydration sleeve. Route the drinking tube through a MOLLE loop or D-ring at the shoulder strap.
- Rain gear: Compress it into a stuff sack and lash it to daisy chains or lash tabs on the bottom of the pack. It stays accessible without eating internal space.
- Navigation tools and radio: Mount on the shoulder strap or front panel at chest height. You need these without removing the pack.
- Spare magazines or ammunition: Use dedicated MOLLE magazine pouches on the side panels, balanced left and right.
Pro Tip: Before any outing, walk 100 yards with your fully loaded pack and stop. Listen. If you hear rattling or feel shifting, something is not secured. Fix it before you cover real distance.
A tactical assault pack built around MOLLE webbing organizes essentials for rapid access and balance over short missions. The design focuses on compactness, modularity, and carrying critical gear efficiently. That same philosophy applies whether you are running a hunting pack or a 72-hour bug-out bag.
What are the benefits and limitations of external attachment points?
External attachment points offer real advantages, but they come with trade-offs that every serious user needs to understand before configuring a pack.
The core benefit is speed. Gear mounted externally on MOLLE panels or D-rings is reachable without opening the pack. In a medical emergency or a fast-moving hunt, that seconds-level difference matters. The second benefit is capacity expansion. A 25L MOLLE assault pack can carry significantly more mission-critical gear when its external panels are loaded with compatible pouches, without increasing the pack’s base footprint.
The limitations are equally real. External attachments raise your pack’s profile, which creates snag hazards in dense brush or tight spaces. They shift weight away from your center of gravity, increasing fatigue over long distances. And gear mounted externally is more exposed to weather, abrasion, and loss if a pouch fails.
| Factor | External attachment | Internal storage |
|---|---|---|
| Access speed | Fast, one-handed reach | Slower, requires opening pack |
| Weight distribution | Shifts center of gravity outward | Keeps weight close to body |
| Snag and profile risk | Higher in dense terrain | Minimal |
| Capacity flexibility | Expands modularly | Fixed by pack volume |
| Weather protection | Lower, gear is exposed | Higher, gear is enclosed |
| Best use case | Lightweight, frequent-access items | Heavy, dense, or sensitive gear |
The right answer is almost always a combination. Use internal storage for your heaviest and most weather-sensitive items. Reserve external points for the gear you reach for most often, kept light and secured tight.
Key Takeaways
Attachment points on tactical packs determine load balance, access speed, and mission readiness. Using each system correctly is what makes the difference between a pack that performs and one that fails.
| Point | Details |
|---|---|
| MOLLE/PALS is load-bearing | Use MOLLE webbing for heavy pouches; never substitute daisy chains for structural attachments. |
| External points are for light gear | Mount only lightweight, frequently accessed items externally to protect your center of gravity. |
| Compression straps matter | Tighten them after loading to eliminate shifting and maintain pack stability under movement. |
| Test before the field | Load your pack to mission weight and stress-test every attachment point before departure. |
| Combine internal and external | Store heavy gear inside and use external MOLLE points for quick-access, lightweight accessories. |
What I’ve learned from years of watching people misload tactical packs
Most users I’ve observed make the same mistake: they treat every loop on a tactical pack as equivalent. They hang a full water bottle from a daisy chain, clip a heavy pouch to a D-ring, and then wonder why the pack feels wrong after two miles. The answer is always load placement, not the pack itself.
The second misconception is that more attachment points mean a better pack. A pack covered in MOLLE webbing is only as good as the discipline of the person loading it. I’ve seen a simple military tactical backpack outperform a heavily accessorized rig because the user understood where to put weight and where not to.
What actually works is restraint. Load the minimum external gear for the specific mission. Test it under real conditions before you need it to perform. And pay attention to how your body feels after 30 minutes of movement. Fatigue in your lower back or one shoulder is a diagnostic signal, not just discomfort. It tells you exactly where your load balance is wrong.
Tactical pack design has improved significantly, with reinforced MOLLE panels and integrated compression systems becoming standard on quality builds. But the physics have not changed. Weight close to your body moves with you. Weight hanging away from your body fights you. Every attachment point decision you make either works with that principle or against it.
— Cody
Fs9tactical gear built around real attachment point standards
Fs9tactical designs gear for hunters, shooters, and survivalists who cannot afford equipment that fails under pressure.
The Fs9tactical MOLLE EDC pouch attaches directly to any PALS-compatible pack panel and keeps your most-reached-for tools organized and accessible without adding bulk. For complete field readiness, the 60-in-1 emergency survival kit pairs with any modular tactical pack to cover 72-hour preparedness needs. Fs9tactical builds every product with ballistic fabrics and reinforced stitching, backed by over 20,000 satisfied users and thousands of five-star reviews. When your gear needs to hold up, the construction behind it matters.
FAQ
What is the role of attachment points in tactical packs?
Attachment points secure and organize gear externally on a tactical pack, allowing modular customization and fast access. They also affect weight distribution and pack stability during movement.
What is the difference between MOLLE and daisy chain loops?
MOLLE/PALS webbing is a structural, load-bearing system designed for heavy pouches and accessories. Daisy chains are lightweight routing loops not rated for heavy gear.
How do I avoid overloading external attachment points?
Mount only lightweight items on daisy chains and D-rings, and reserve MOLLE webbing for heavier pouches. Always test each attachment zone under full load before field use.
Do external attachments affect how a tactical pack feels to carry?
External attachments shift your center of gravity away from your body, which increases fatigue over distance. Keeping external gear light and tightly secured minimizes this effect.
What gear works best on external MOLLE attachment points?
First aid kits, radio pouches, hydration tube clips, and navigation tools are ideal for external MOLLE attachment. These items are lightweight and benefit from one-handed, no-unpack access.
